How to Use Blastr
Upload once, publish everywhere. BLASTR sends your vertical videos and photos to YouTube Shorts, Instagram Reels, TikTok, and Facebook Reels at the same time. Your footage, photos and music live in your Content Library and Sounds, and BOOSTR turns a clip into a tour poster, a lyric video or a captioned video. Here's everything you need to know.
Overview
Every blast goes the same way:
- Connect your socials. Link your YouTube channel, Instagram and Facebook Page, and TikTok account to a workspace. You only do this once per workspace.
- Start a blast. Press New blast on the home screen, or drag files onto any page of BLASTR. You can add several videos and photos at once.
- Fill in one page. The composer holds everything: the cover, the caption, and a row for each platform. A checklist at the bottom tells you when it's ready.
- Send it. Blast now, or pick a time from the arrow beside the button. BLASTR shows live progress for every platform.
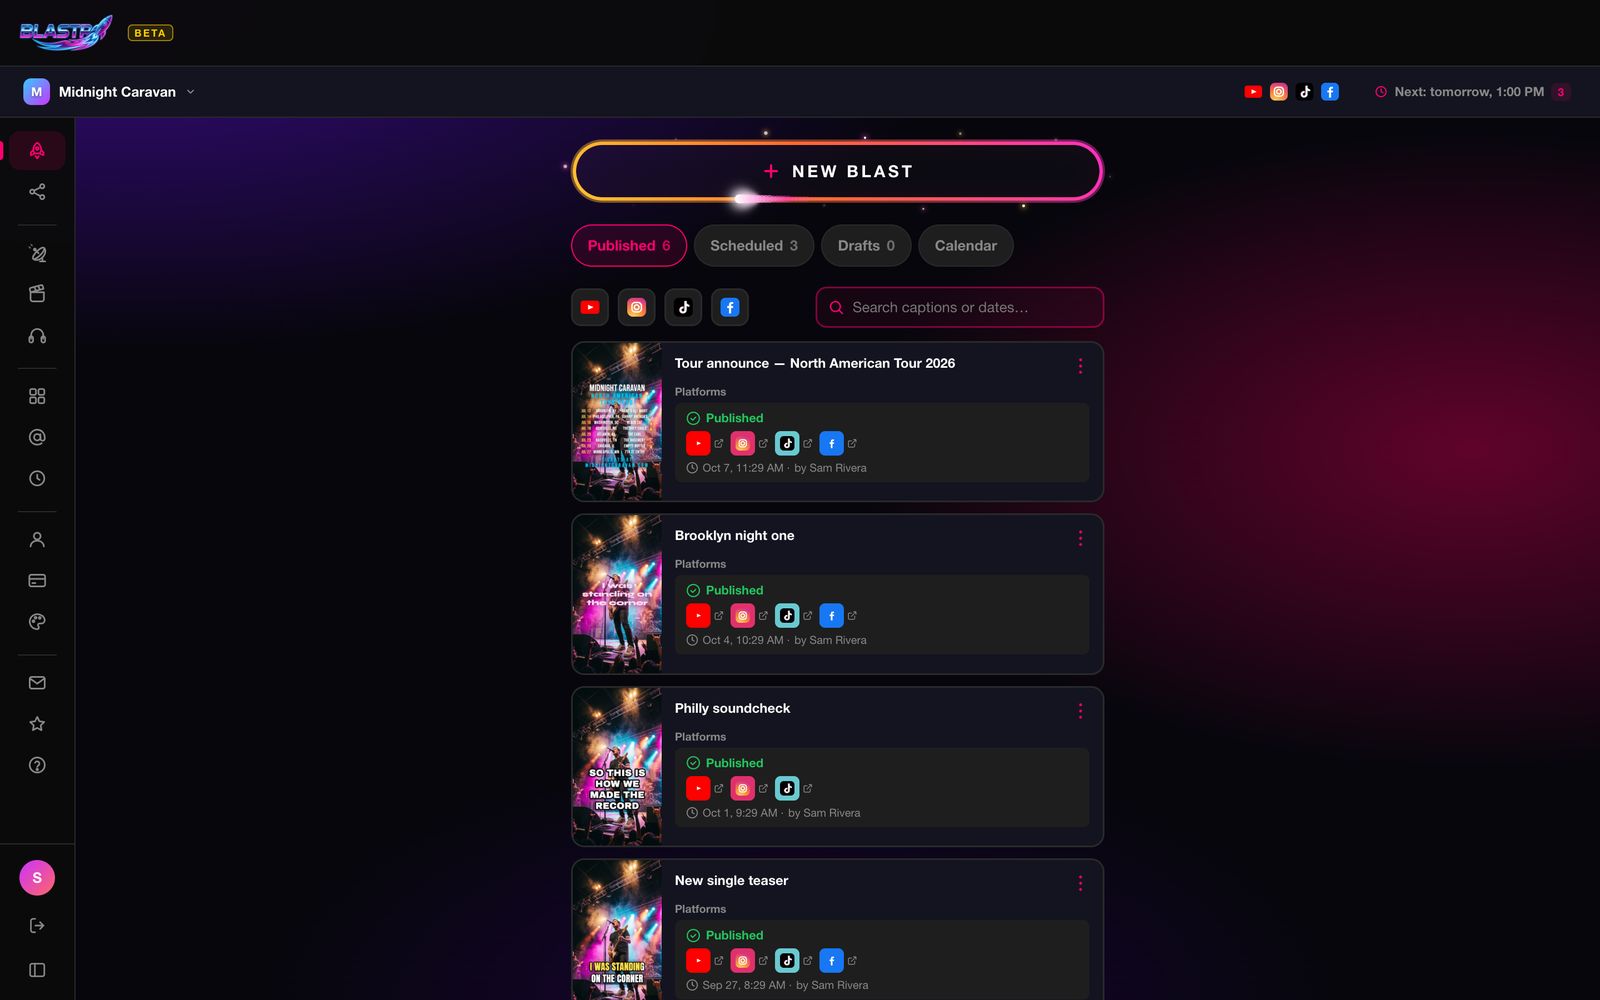
On a computer, the sidebar on the left takes you everywhere: BLASTR (the rocket), Connections, BOOSTR, Library, Sounds, your workspace's settings and your account. On a phone, the same places are in the bar at the bottom of the screen, and your account sits behind your picture at the top right.
Connect Your Socials
Open Connections from the sidebar or the bottom bar. Each platform connects through its own official login, so BLASTR never sees your passwords.
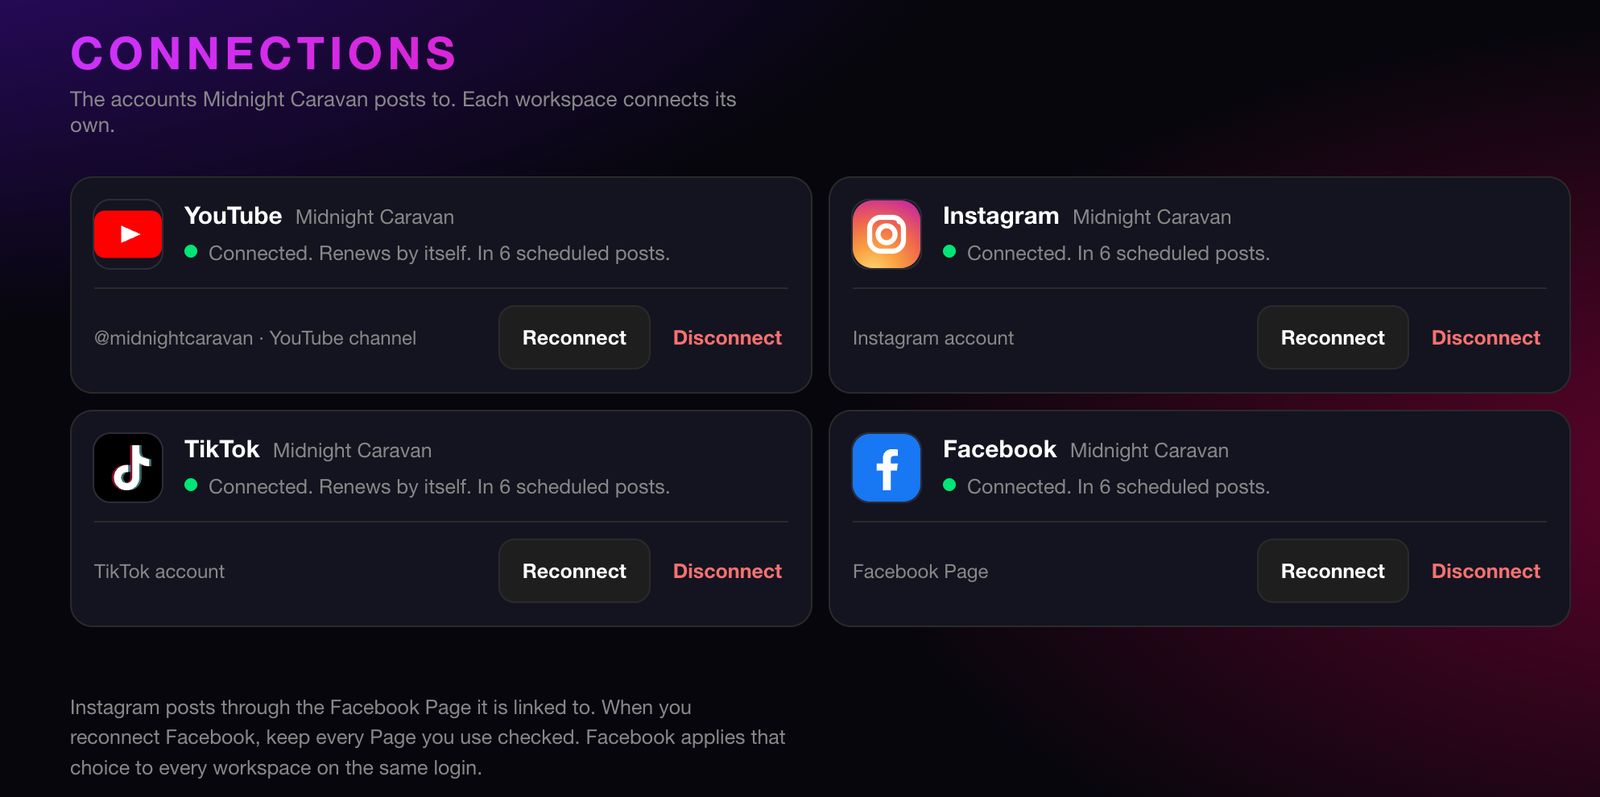
Each card shows a status line in plain words: Connected. Renews by itself., Expires in 5 days. Reconnect to keep posting., or Needs reconnecting. Posts here would fail. Use Reconnect to refresh a login and Disconnect to remove one. If posts are already scheduled for that platform, the confirmation tells you how many.
YouTube
Sign in with the Google account that owns your channel. BLASTR uploads Shorts directly to that channel and schedules them with YouTube's own scheduler.
Instagram + Facebook (one login)
- Create a Facebook Page if you don't have one: on Facebook, go to Pages → Create new Page. Your band, project, or brand name is fine.
- Switch Instagram to a Professional account: in the Instagram app, Settings → Account type and tools → Switch to professional account, then choose Creator or Business.
- Link the two: in the Instagram app, Settings → Account type and tools → Sharing to other apps → Facebook, and connect your Page.
YouTube and TikTok need none of this. You can connect and blast to those right now while you sort out the Meta side.
Once that's in place, Instagram and Facebook connect together through Meta. Sign in with the Facebook account that manages your Page, and make sure your Page is ticked in Meta's permission screen. If your account manages more than one Page, BLASTR asks you to Choose your account, so you pick exactly which Page (and its linked Instagram) belongs to this workspace.
- Manage several Pages? Tick every Page you use in BLASTR, not just one. Meta grants access per Facebook account, so unticking a Page removes BLASTR's access to it everywhere, including in your other workspaces.
- Connected the wrong account? Reconnect and pick a different Page. The new choice replaces the old one.
- A card that reads Facebook Page only — no Instagram linked means the Page has no Instagram account linked to it yet (step 3 above).
TikTok
Sign in with your TikTok account in the popup. If the password screen gives you trouble, use the QR code login: open TikTok on your phone and scan it.
Your First Blast
Press New blast and pick your files, or drop them anywhere on BLASTR. Everything happens on one page, the composer. Uploading and converting start the moment a file arrives, so you can write while it finishes.
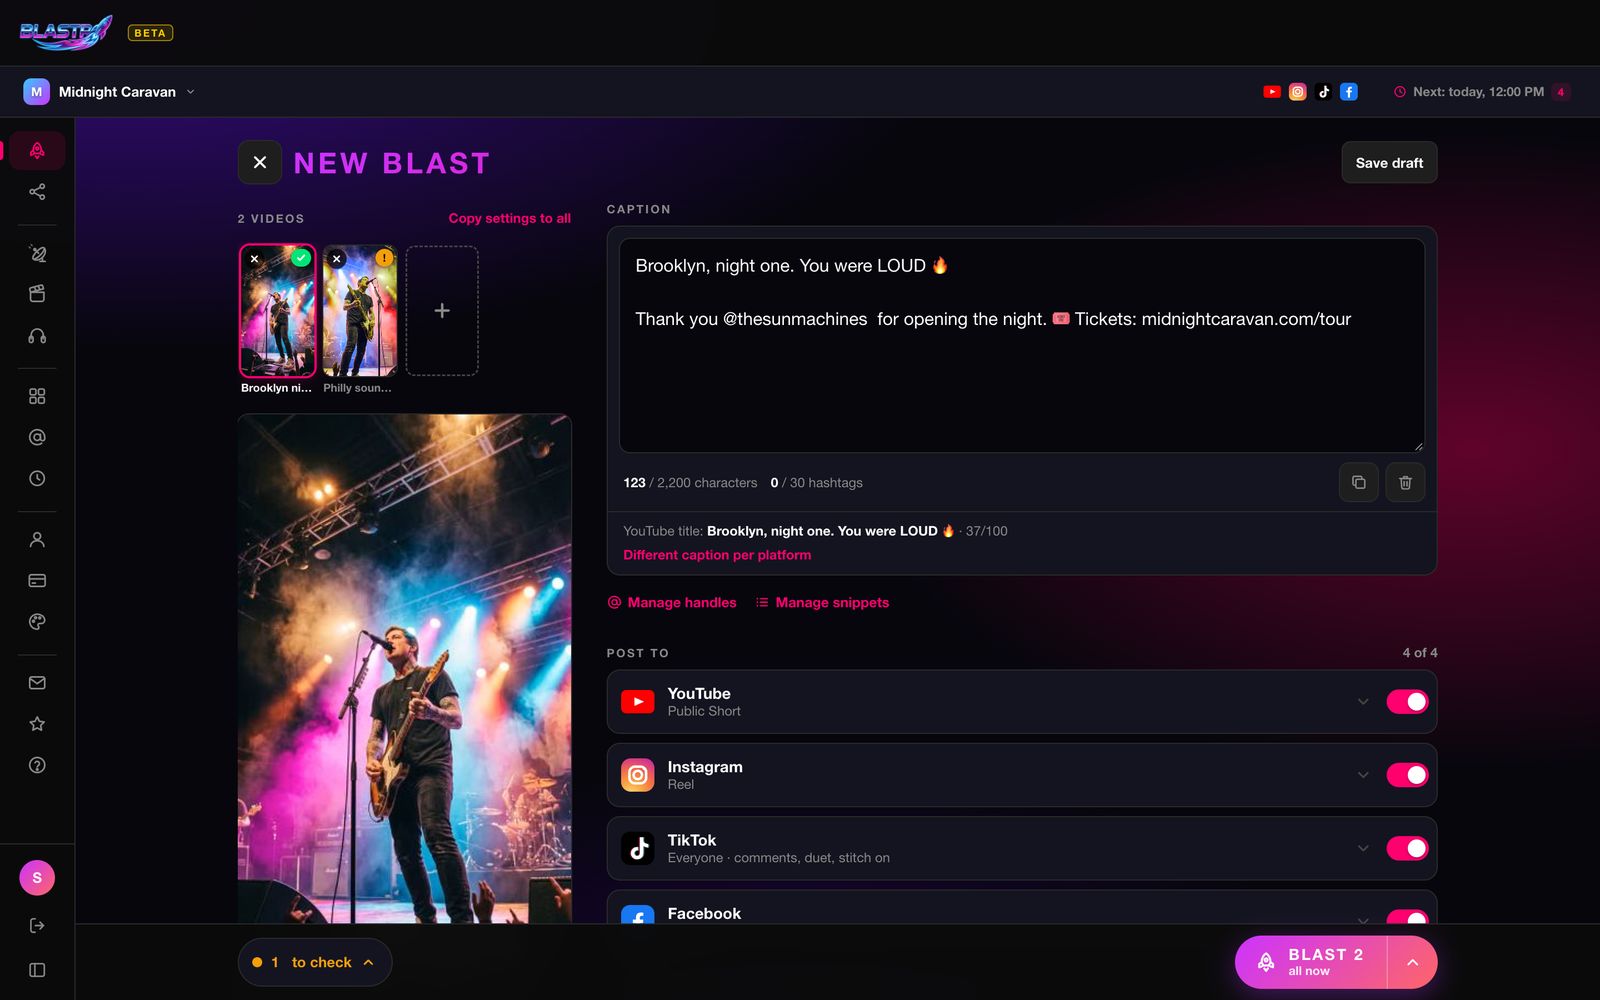
- Pick a video. The row at the top shows every file in this blast. Tap a tile to work on it, + to add more, and × to take one out. Each tile carries a badge: a green check when it's ready, a ! when something is worth a look, or a red count of things to fix. With more than one video, Copy settings to all copies the platforms and their settings (never the caption, cover or time).
- Check the cover. BLASTR picks a frame from the middle of the video automatically. Change cover lets you scrub to a different frame or upload your own image, and Go back to the auto pick undoes it. The cover is used on YouTube and as the Instagram Reel cover. Preview shows the cover with each platform's caption cut off where that app cuts it.
- Write the caption. One caption goes to every platform. See Captions for the YouTube title, handles and snippets.
- Choose platforms. Each platform has a row with a switch and a one-line summary of its settings (Everyone · comments, duet, stitch on). Tap a row to open its options. A platform that isn't connected shows Connect instead of a switch.
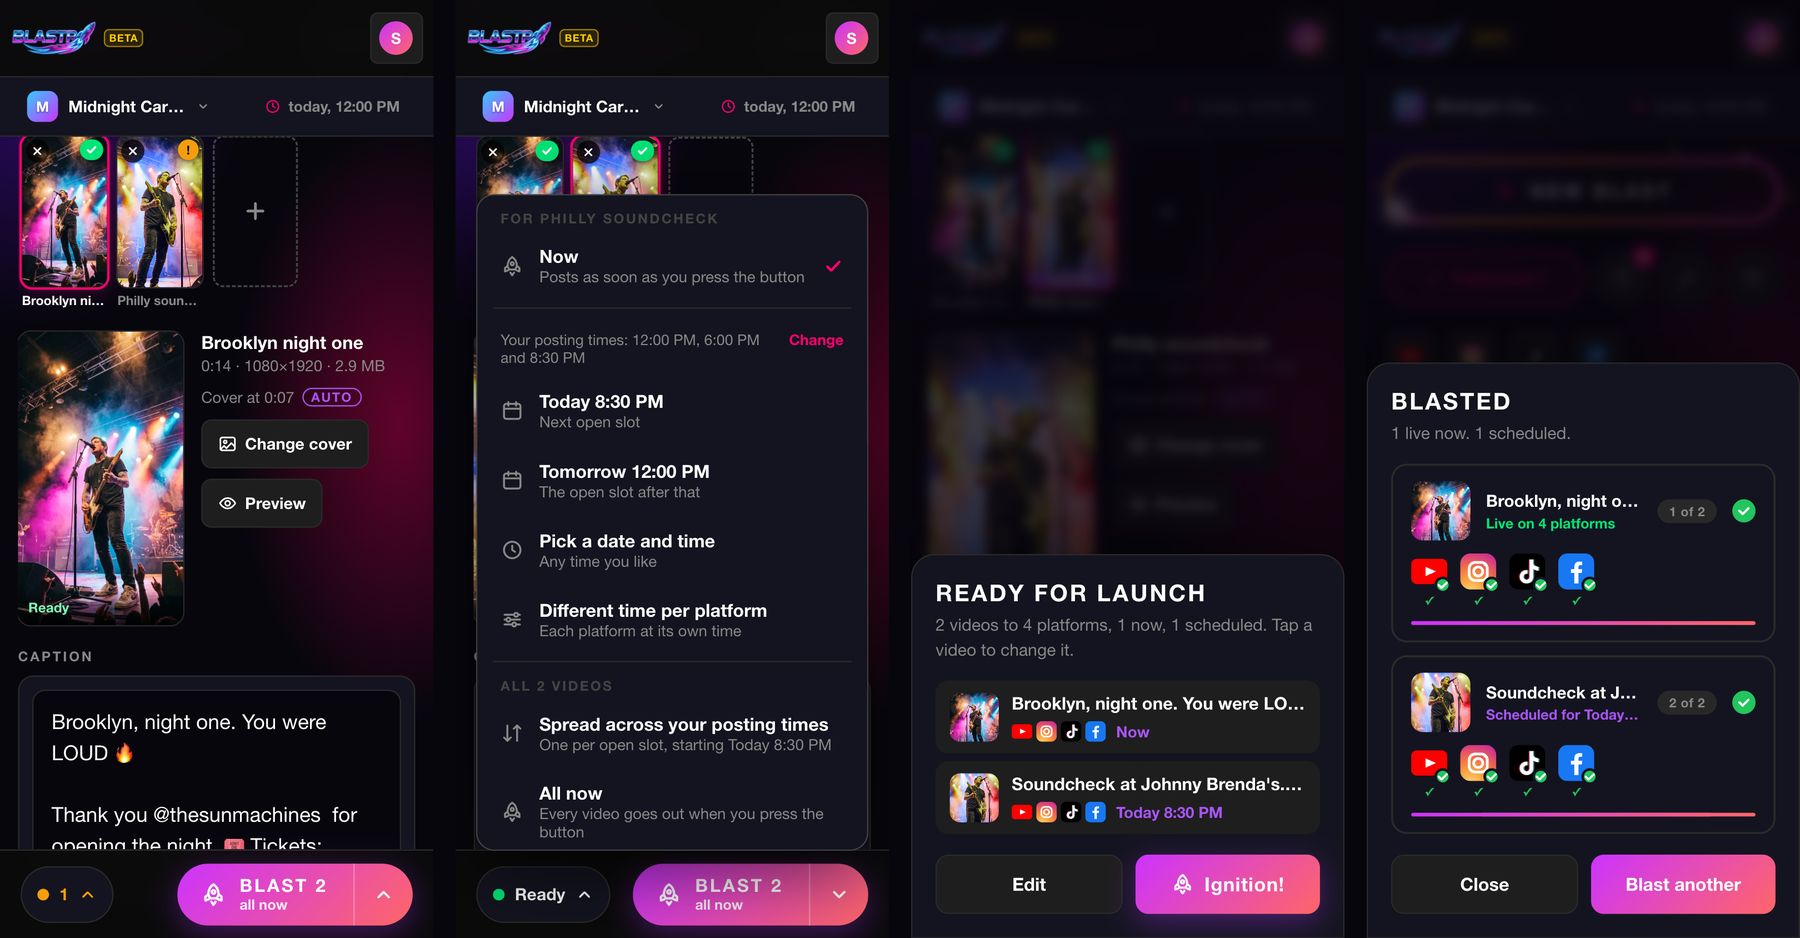
- Send. The big button at the bottom says what it will do: Blast 2 · all now, or Blast 1 · and schedule 1. The arrow beside it opens the time menu (see Scheduling).
- Ready for launch. Pressing the button shows every video, where it's going and when. Tap a video to change it, Edit to go back, or Ignition! to send.
The checklist
The pill at the bottom left reads Ready, 1 to check or 1 to fix. Tap it to see the list. Each item has a button that jumps straight to the field it's about.
- To fix stops the blast. Examples: no platform picked, TikTok's Who can view not chosen, a scheduled video with no time, or an upload that failed. Pressing the send button anyway shakes it and opens the list.
- To check never stops anything. Examples: no caption, a YouTube title over 100 characters, a clip too long for an Instagram Reel, a photo that isn't 1:1, 4:5 or 9:16, or a connection that needs reconnecting.
Captions
Write one caption and it goes everywhere. Under the box you'll see a running count of characters and hashtags, with buttons to copy or clear the caption.
- The YouTube title. A blank line splits the caption: everything above it becomes the YouTube title (capped at 100 characters) and everything below becomes the description. Instagram, Facebook and TikTok always get the whole caption. The line under the box shows exactly what YouTube will use.
- A different caption per platform. Tap Different caption per platform to give each platform its own box, for example different hashtags on TikTok.
- @ for handles. Type
@at the start of a word to pick from your saved people and every account you've mentioned, tagged or collaborated with before. Press Enter or Tab to insert one. - / for snippets. Type
/and a shortcut (like/tix) to drop in saved text such as a ticket link or your hashtags. Enter, Tab or Space inserts it.
On the free Rookie plan, every caption ends with “🚀 Made with @Blastr.social”. It's added when you blast, so your caption box always shows exactly what you typed. On YouTube it goes in the description, never the title.
Any paid plan removes it, and your captions post exactly as written. On a paid plan and want to keep the shout-out? Switch it back on under Profile → Account Settings → BLASTR Tag.
Handles & Snippets
Your drummer is @drummerdude on Instagram but @drummerdude_official on TikTok, so which one goes in the caption? With handles, both: save a person once and BLASTR swaps in the right handle for each platform when the blast goes out. Open Handles & snippets from the sidebar's workspace section (on a phone, from your profile menu), or from the Manage handles and Manage snippets links under the caption.
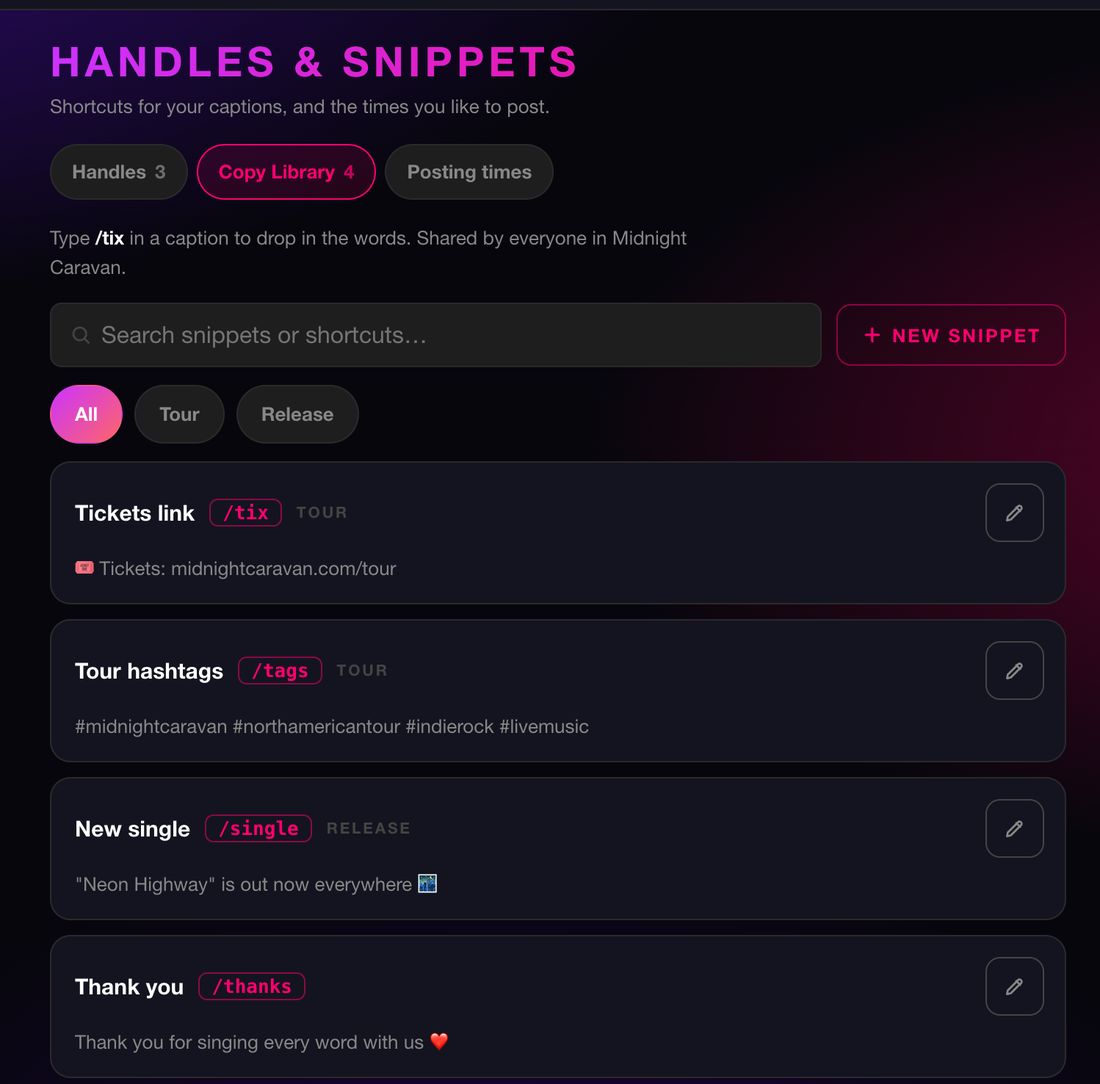
/tix in any caption to drop in the ticket link.The page has three tabs:
| Handles | Add person, give them a one-word name you'll type in captions (bowlingforsoup), then fill in their handle on each platform. Type @bowlingforsoup in any caption and each platform gets that person's own handle. Leave a platform blank and the name goes out as typed. Up to 30 people per workspace. |
| Copy Library | Saved text for captions, with an optional /shortcut and category. New snippet adds one; Insert drops it into the blast you're working on. Shared by everyone in the workspace. |
| Posting times | The times you usually post, used by the time menu's open slots (see Scheduling). |
- Names aren't case-sensitive, and dots and underscores don't matter:
@BowlingForSoupand@bowling_for_soupfind the same person. - Handles work in captions and in the YouTube title and description.
- Handles, snippets and posting times all belong to the workspace, so each band has its own.
Platform Settings
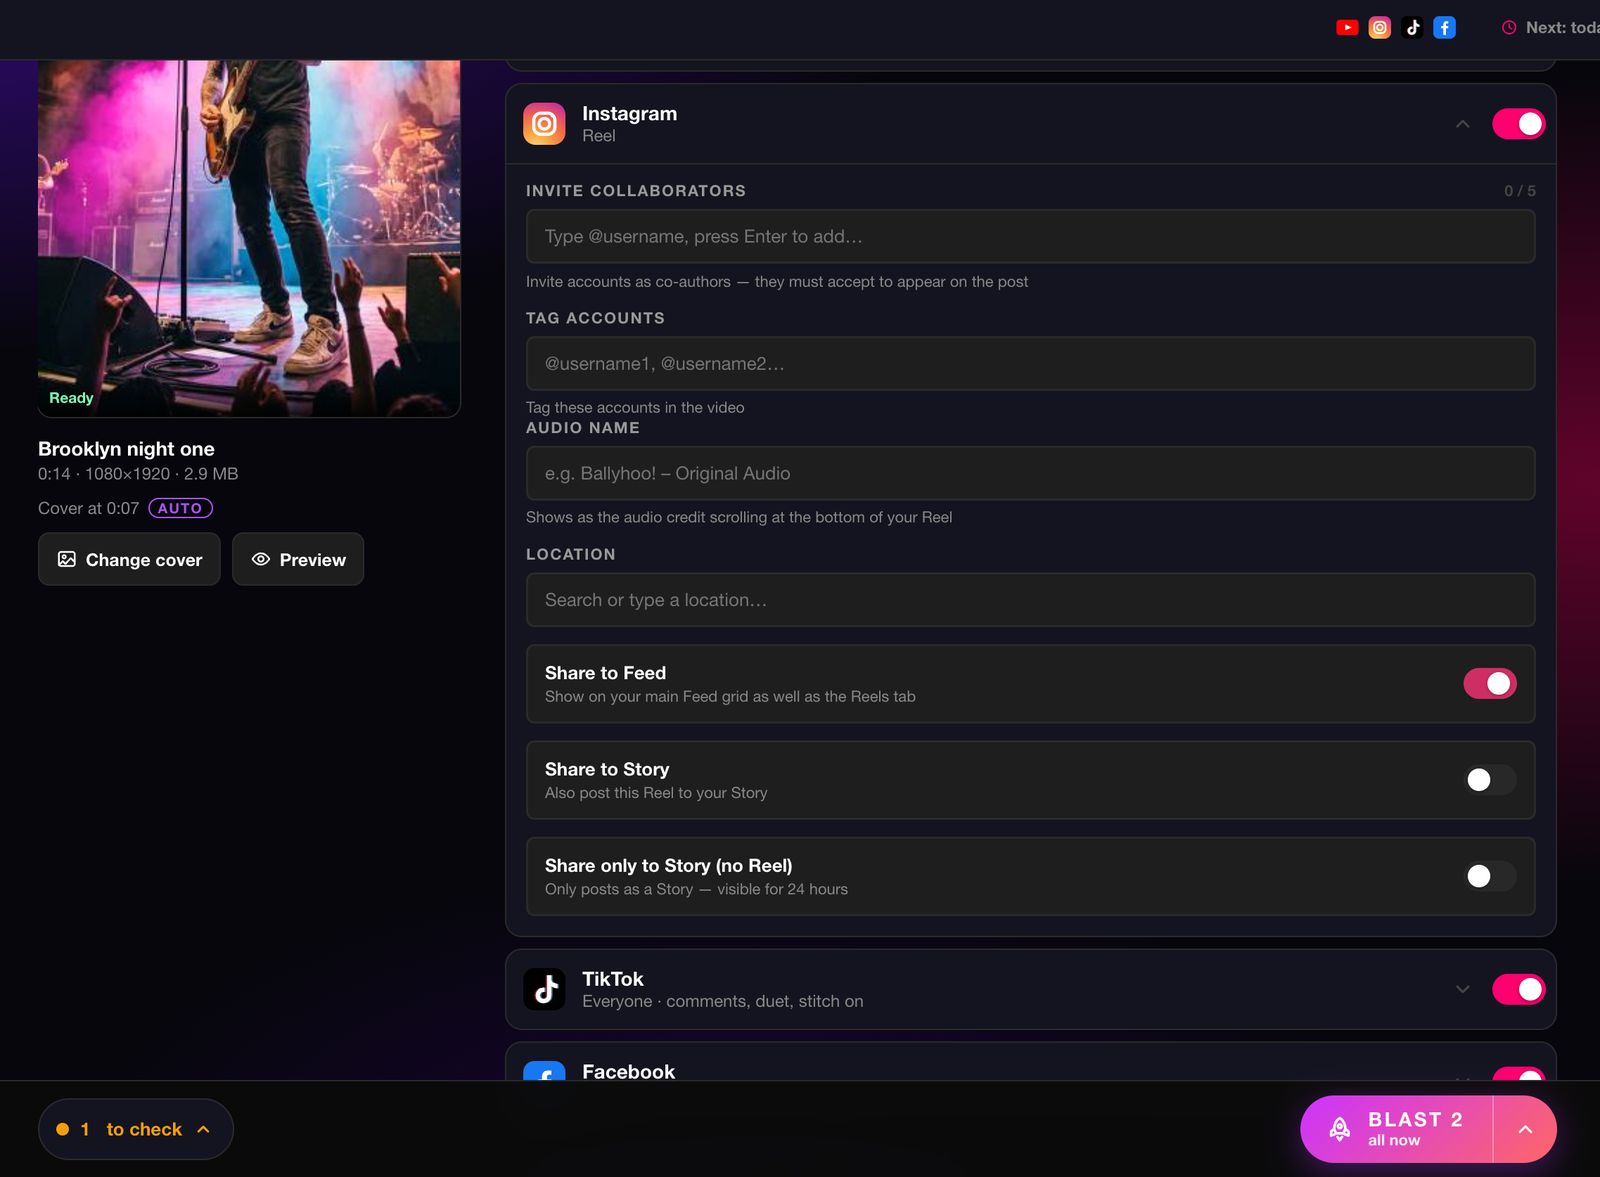
Tap a platform's row in the composer to open its options.
YouTube
| Title & Description | Filled in from your caption. Blank line splits title & description controls the split. |
| Visibility | Public, Unlisted, or Private. |
| Category | YouTube video category (Music, Entertainment, etc.). |
| Notify subscribers | Whether your subscribers get the new-video notification. |
| Audience | No, it's not made for kids or Yes, it's made for kids. YouTube requires an answer. An 18+ age restriction has to be set in YouTube Studio. |
| Invite Collaborators | Add up to 5 accounts as co-authors of the Reel. They get an Instagram notification and must accept; the post then appears on both profiles. Collaborators must be public accounts. |
| Tag Accounts | Tag people in the post: @user1, @user2. On a photo, the tags are placed along the lower third. An account that's private or doesn't exist is dropped rather than failing the post. |
| Audio Name | The scrolling audio credit on your Reel. Great for naming your song. |
| Location | Start typing and pick a place. Setting it here fills the Facebook location too, and vice versa. |
| Share to Feed | On by default. Turn it off to keep the Reel in the Reels tab only, off your main grid. |
| Share to Story | Also posts the Reel to your Story after it publishes. |
| Share only to Story (no Reel) | Skip the Reel and post just a Story. Captions, collaborators and tags don't apply to Stories. |
TikTok
| Send to TikTok Inbox | Optional. Instead of publishing, the video arrives in your TikTok inbox as a notification. Open it in the TikTok app to add sounds and effects, then post it yourself. Leave it off to post straight to your account. |
| Who can view | Everyone, Friends, or Only you. TikTok requires an answer before a direct post (not needed for Inbox). |
| Allow comments / duet / stitch | Turn each on or off for this post. |
| AI-generated content | Adds TikTok's AI-generated label. |
| Commercial Content Disclosure | Turn on This content promotes a brand, product or service, then pick Your brand (your own business), Branded content (a paid partnership), or both. |
| Allow Comments | Turn comments on or off for the Reel. |
| Location | Shared with the Instagram location field. Set either one. |
| Share to Groups | Also share the post to Facebook Groups you manage (comma-separated Group IDs). |
| Share to Story | Also posts the video to your Page's Story. |
Length & Caption Limits
Each platform has its own rules. The composer's checklist flags anything that breaks one before you blast, so nothing fails as a surprise. The platforms that can take the post always still go out.
| Platform | Max length | If it's longer |
|---|---|---|
| Instagram Reel | 90 seconds | Instagram is skipped for that video. Its API can't publish a longer Reel. Your other platforms still post. |
| Instagram Story | 60 seconds | Only the Story is skipped (when Share to Story or Share only to Story is on). Your Reel still posts. |
| YouTube | No practical limit | Longer clips post as a regular video instead of a Short. |
| TikTok | Up to ~10 minutes | Handles long-form comfortably. |
| No practical limit | Posts fine. |
| Caption rule | What happens |
|---|---|
| Instagram: 2,200 characters, 30 hashtags | The counters under the caption box keep track. |
| YouTube title: 100 characters | Add a blank line after the title so the rest goes in the description. |
| TikTok: 30 @mentions | Mentions past the 30th post as plain text instead of links. Nothing is cut from your caption. |
Photo Blasts
Photos work like videos. Add a JPG, PNG or WebP and blast it to Instagram, Facebook and TikTok. YouTube doesn't take photo posts, so it's switched off automatically.
Aspect ratios & the crop tool
Platforms want photos in 1:1 (square), 4:5 (portrait) or 9:16 (full-screen). If yours is something else, the checklist says Photo may get cropped and its Crop button opens the crop tool (also under the photo as Crop photo). Pick a ratio, then drag to position and pinch or scroll to zoom. Rule-of-thirds guides help you line up the shot, and BLASTR never stretches a photo beyond its real resolution.
Scheduling
Press the arrow beside the send button to choose when each video goes out:
| Now | Posts as soon as you press the button. |
| Next open slot | The next of your saved posting times that isn't already taken, and the one after that. |
| Pick a date and time | Any time you like. |
| Different time per platform | Each platform at its own time: the YouTube Short at noon, the TikTok at 6 pm. |
| Spread across your posting times | With several videos: one per open slot, in order. |
| All now | Every video in the blast goes out when you press the button. |
Whatever you pick shows on the video's tile and on the button. Save your usual times under Handles & snippets → Posting times (the menu's Change link goes there too). Open slots skip times already taken by other scheduled posts, and roll into the next day when today is full. To batch a week of posts, add seven videos, pick Spread across your posting times, and you're done.
How each platform schedules
- YouTube & Facebook schedule natively on their own servers.
- Instagram & TikTok have no built-in scheduling, so BLASTR's servers hold your video and publish it at the exact time you chose. You don't need to be online.
- Facebook needs about 10 minutes' notice. Schedule something sooner and BLASTR moves only the Facebook post to the earliest time Facebook accepts. The card says so (Facebook needs 10 minutes' notice — this one posts at 3:11 PM). Your other platforms still go out on time.
Changing a scheduled post
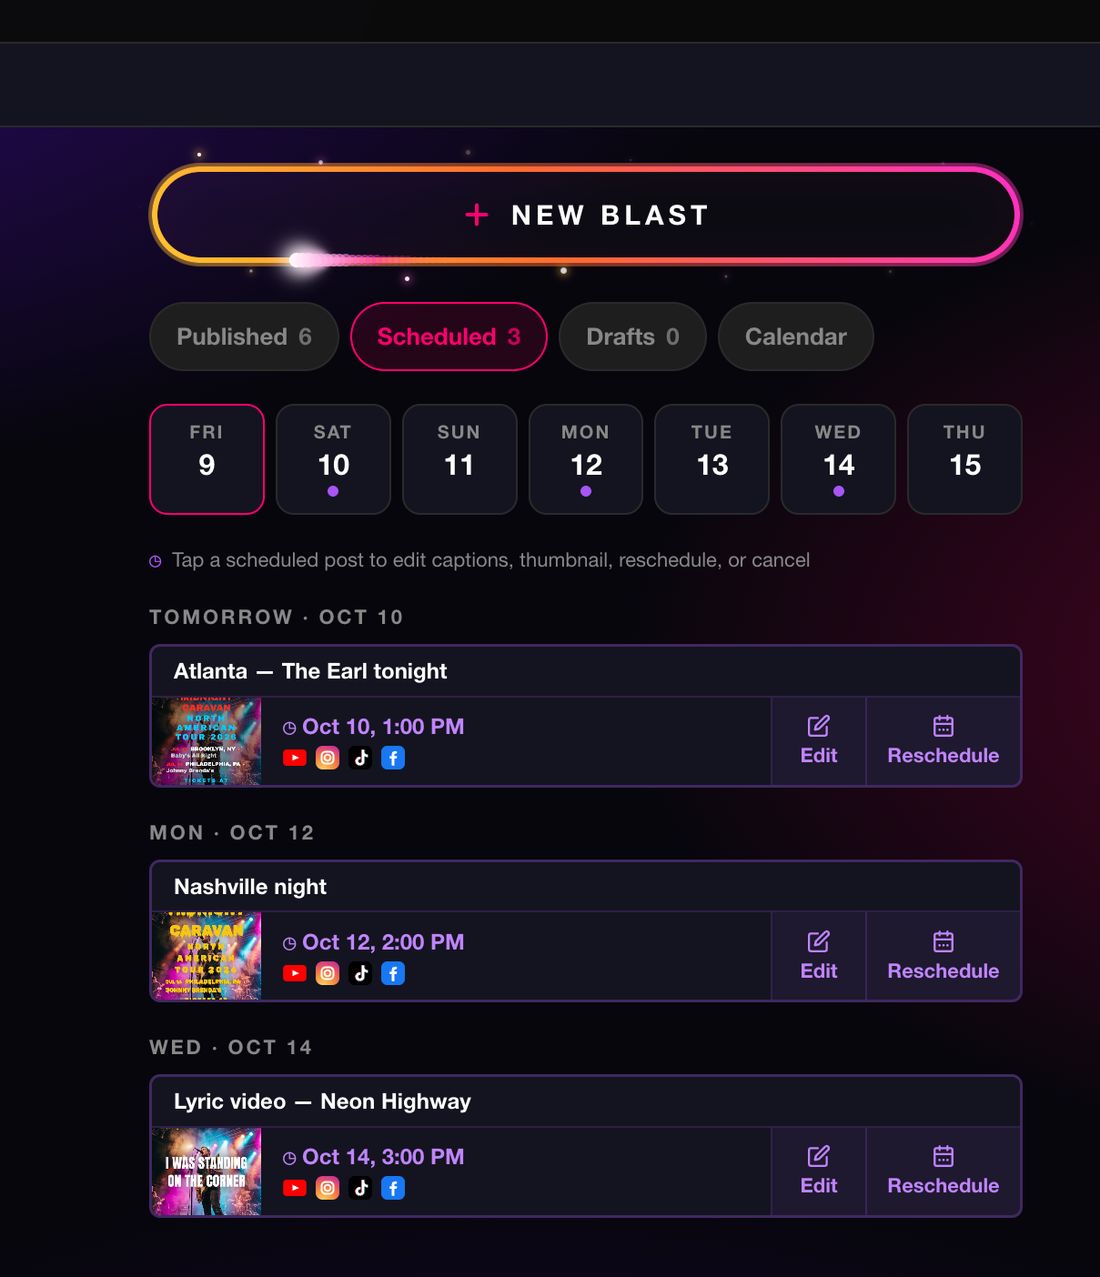
- Edit opens the post in the composer, where you can change the caption, cover and settings, then Save changes.
- Reschedule moves it to a new time. This moves Instagram, TikTok and Facebook. YouTube holds its copy on its own servers, so change a YouTube time in YouTube Studio.
- Editing the caption of a scheduled or published post updates it on the platforms that allow edits. If a platform can't be updated (YouTube can't), BLASTR tells you which.
Your Posts & Drafts
Everything you've blasted lives on the BLASTR home screen, in four tabs:
| Published | Posts that are live. Each card links to the post on every platform it went to. Filter by platform, or search captions and dates. |
| Scheduled | Posts waiting for their time, with a week strip on top. They move to Published automatically when they go live. |
| Drafts | Posts saved to finish later. Open one to pick up exactly where you left off. Save draft is at the top of the composer on paid plans. A blast that fails also lands in Drafts, on every plan. |
| Calendar | The month at a glance. Drop a video on any day to schedule it for that date, or hover a day and press +. On a phone, press and hold a day. |
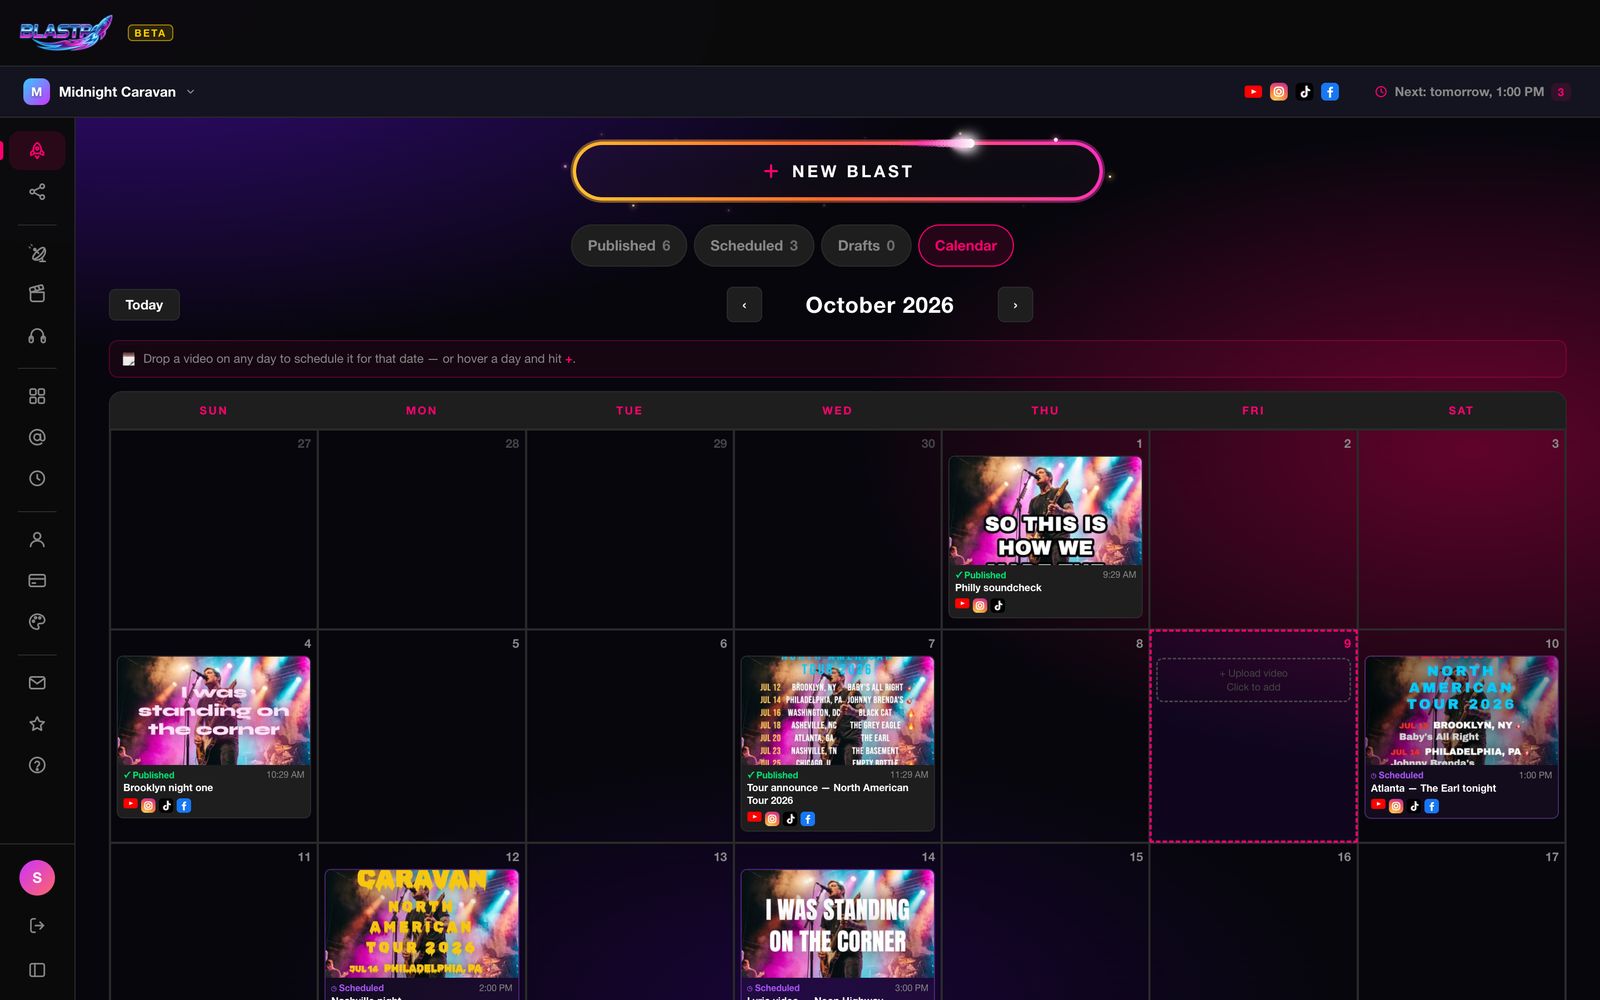
The ⋮ menu on a post offers Blast again (a new blast with the same caption and settings), View in Content Library, Download video, Edit in YouTube Studio, and Retry for any platform that failed.
Add a platform to a post you already blasted
Forgot TikTok? No need to re-post everything. Open the post, switch the missing platform on, set its options, and save. BLASTR blasts only the new platform and leaves the rest untouched. The post stays one card with all its links.
Your blasts are kept
On Cadet, Voyager and Interstellar, every blast is saved to your Content Library in a category called Blasted, and kept for as long as it's there. That copy is what lets you retry a failed platform, add a new one, or blast the same clip again later, from any device. Blasting something that's already in your library doesn't make a second copy; it adds to that clip's Blasted 2× count instead.
If your library is full, or you've switched off Save blasts & BOOSTR videos here, a blast keeps a short backup instead: Cadet 1 day, Voyager 3 days, Interstellar 5 days, shown as a green Backed up · N days left chip. After that you'd need to re-upload the file to post it somewhere new.
On Rookie (free) there is no backup of a published video. As soon as every platform goes live, BLASTR deletes its copy, so download anything you want to keep from the ⋮ menu right after posting. A blast that fails is different: we hold that video for 7 days so you can retry it.
Notifications
Blasts run in the background, and scheduled posts can go live hours after you've closed the app, so BLASTR can tell you the moment a blast publishes.
- Open Profile → Account Settings and find Notifications.
- Press Turn On and allow notifications when your browser asks.
- Press Send a test notification to confirm it works.
You'll get one notification per blast: published, partially published (some platforms worked, some didn't), or failed. That covers immediate blasts and scheduled posts that go live later.
Save as Defaults
Once a video's settings are how you like them (which platforms are on, YouTube visibility and audience, Instagram collaborators, tags and share options, TikTok privacy, all of it), press Save these as defaults under the platform rows.
- Every new video in that workspace starts with your defaults.
- Defaults are per workspace, so each band or brand has its own.
- Captions and locations are deliberately not saved, because those change with every post.
Content Library Paid plans
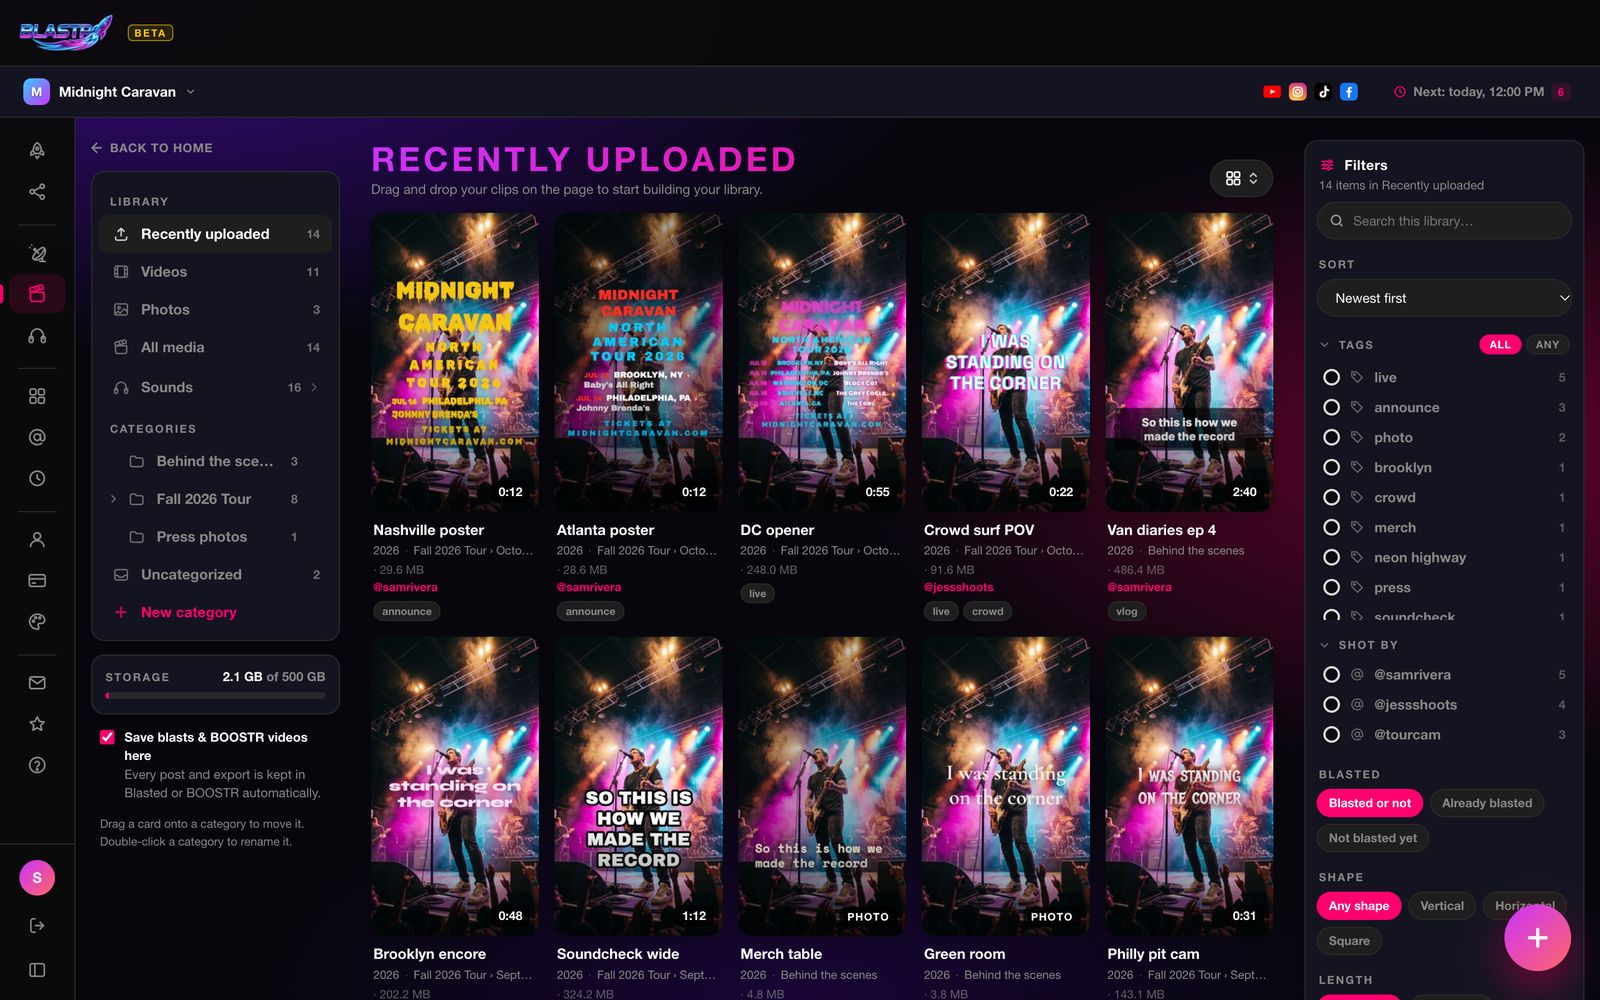
The Library tab is your band's media drive: every clip and photo you shoot, sorted the way you think about it, one tap from a blast or from BOOSTR. Add files with the + button or by dropping them anywhere on the page.
Finding things
- The left side is where things live. Recently uploaded (your newest 24), Videos, Photos and All media, then your categories. Categories can have one level of subcategories (Fall 2026 Tour › September, October), and opening a category shows everything in its subcategories too. Drag a card onto a category to move it; double-click a category to rename it.
- The right side is what you're looking for. The Filters panel has search, sort, Tags (match all or any), Shot by, Blasted, Shape, Length and Added, plus Clear all. Each choice shows how many items it would leave. On a phone, the same panel opens from the Filters button.
- Two views. The button at the top right switches between Preview (cards, Regular or Compact) and List, grouped by Category, Shot by, Month added, or not at all. Your choice is remembered on that device.
- Quick look. On a computer, press Space to open the card under your pointer (or the selected row), the arrow keys to step through, and Space again to close.
Using your media
- Each item's ⋮ menu has Send to BLASTR, Blast again, Send to BOOSTR, Quick look, Edit details… (name, category, shot by, tags, notes), Download and Delete.
- Select several items to Send to BLASTR, move, tag, download or delete them together.
- Credits. Everything you add is credited to the handle in Account Settings → Instagram handle, shown as @handle on the card. Change it in Edit details to credit someone else, like the photographer who shot it. A clip sent to BLASTR arrives with that credit already at the end of the caption, after a blank line, where you can keep or delete it.
- Saving to your iPhone. Download gets the file ready, then Save opens the iPhone share sheet so you can save to Photos or Files.
- Save blasts & BOOSTR videos here (under the categories) files every blast and every BOOSTR export in the library automatically, in the Blasted and BOOSTR categories. It's on by default and applies to the whole workspace.
Storage is pooled across your workspaces: 50 GB on Cadet, 200 GB on Voyager, 500 GB on Interstellar. The meter under the categories shows what's used. See Plans & Billing for what happens if a plan ends.
Sounds & Records Paid plans
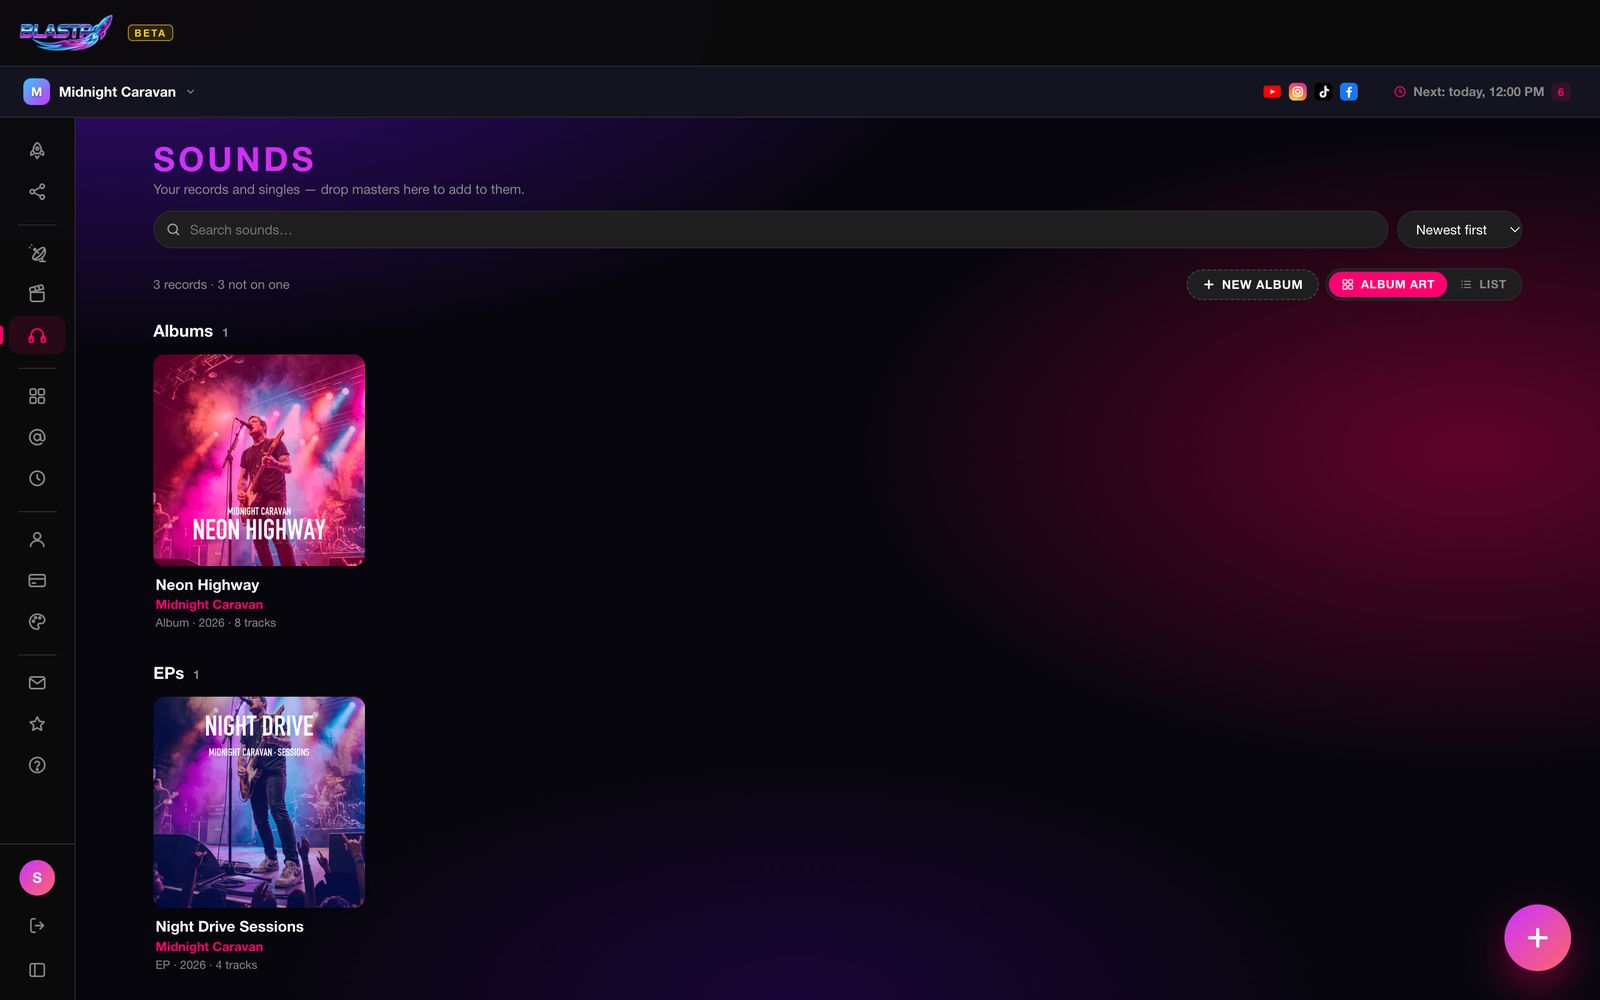
The Sounds tab (the headphones) holds your music: albums, EPs, singles and loose sounds, with a player and pages you can share. Records are grouped the way a discography is: Albums, EPs, Singles, Mixtapes, Compilations and Live albums, then Loose sounds. Album art and List switch the view.
Making a record
- Drop the whole thing at once. Drag the audio files and the cover art onto the Sounds shelf together and they become one record: cover on, tracks numbered, titles read from the files.
- From sounds you already have. Select loose sounds and choose New album from N sounds…, or add them to an existing record.
- From scratch. Press New album.
BLASTR reads titles and the running order from each file's tags, or from filenames like 01 Neon Highway_MASTER.mp3, tidying up words like "final mix" and fixing ALL-CAPS titles. It never overwrites a title you typed yourself. Read the files again in the record's menu runs it again.
Inside a record
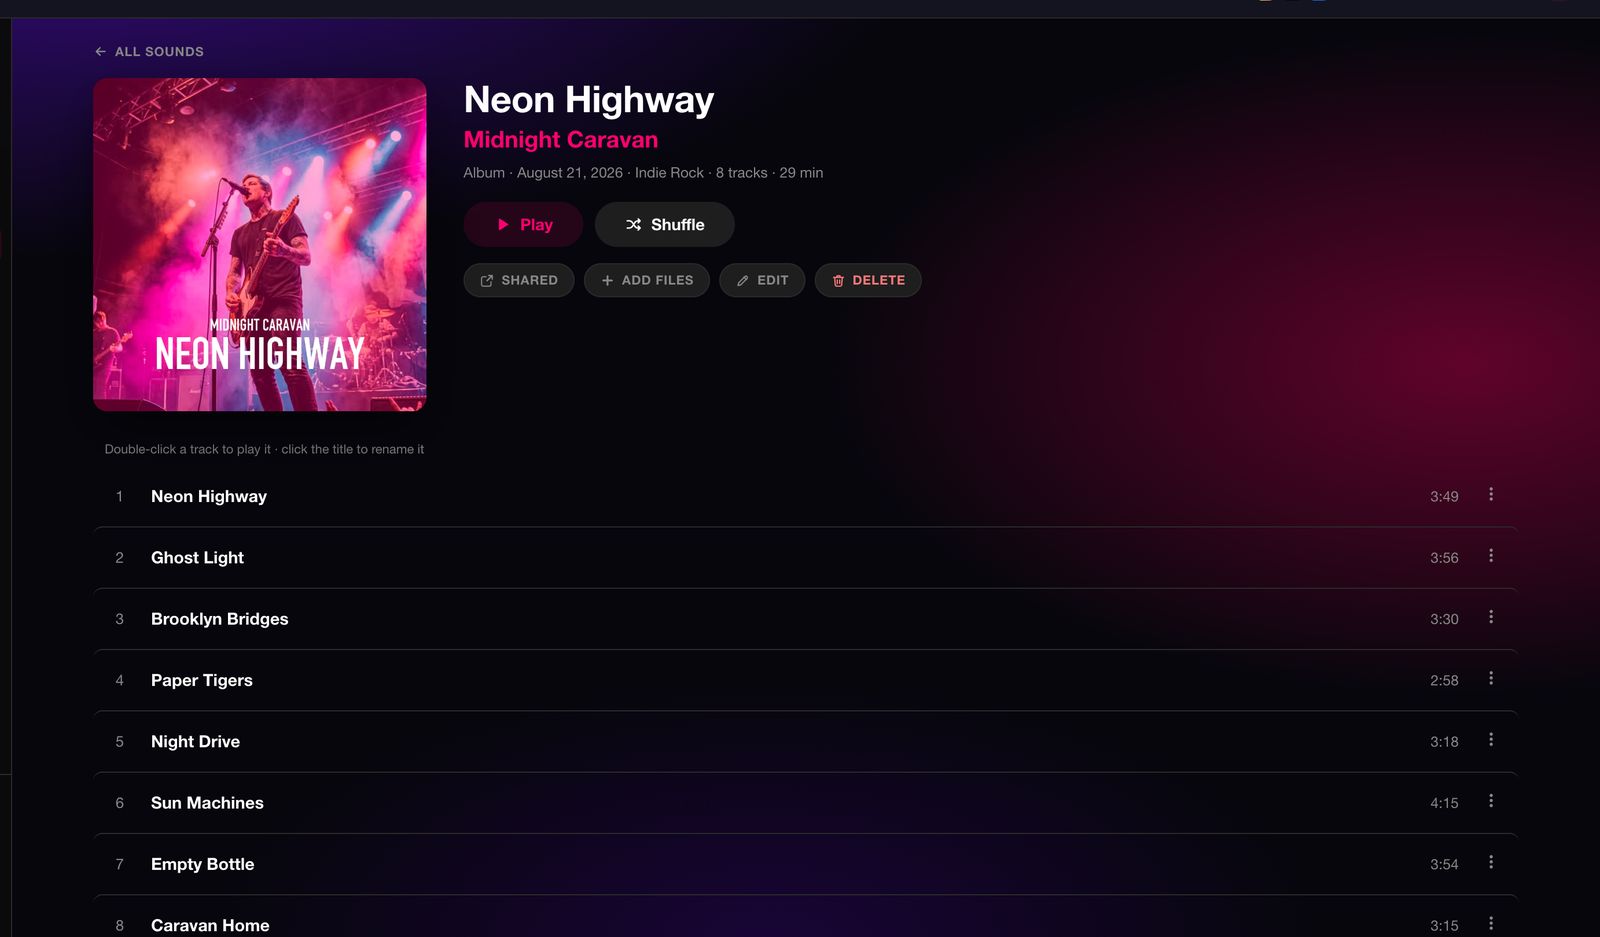
- Play and Shuffle play the whole record. On a computer, double-click a track to play it and click its title to rename it. On a phone, tap to play and rename from the track's ⋮. Drag the grip to reorder.
- Edit sets the title, artist, release type and date, genre, record label (printed as the ℗ line), cover art, liner notes and credits. Pick a role for each person, or + New role… for one of your own. Credits print together: "Mixed by Ari Lin and Dana Park".
- Add files adds tracks, or a new cover, from your phone or computer. Dropping files onto an open record does the same.
- Deleting a record keeps its tracks as loose sounds.
Sharing
Share… on a record (or Share this song… on a single track) gives you a link to a page with the cover, the player and the credits. Choose Public (anyone with the link) or Private (only signed-in people with access to your workspace), and turn Allow downloads on or off. Reset link makes a new link, and the old one stops working immediately.
BOOSTR — Make the Video Paid plans
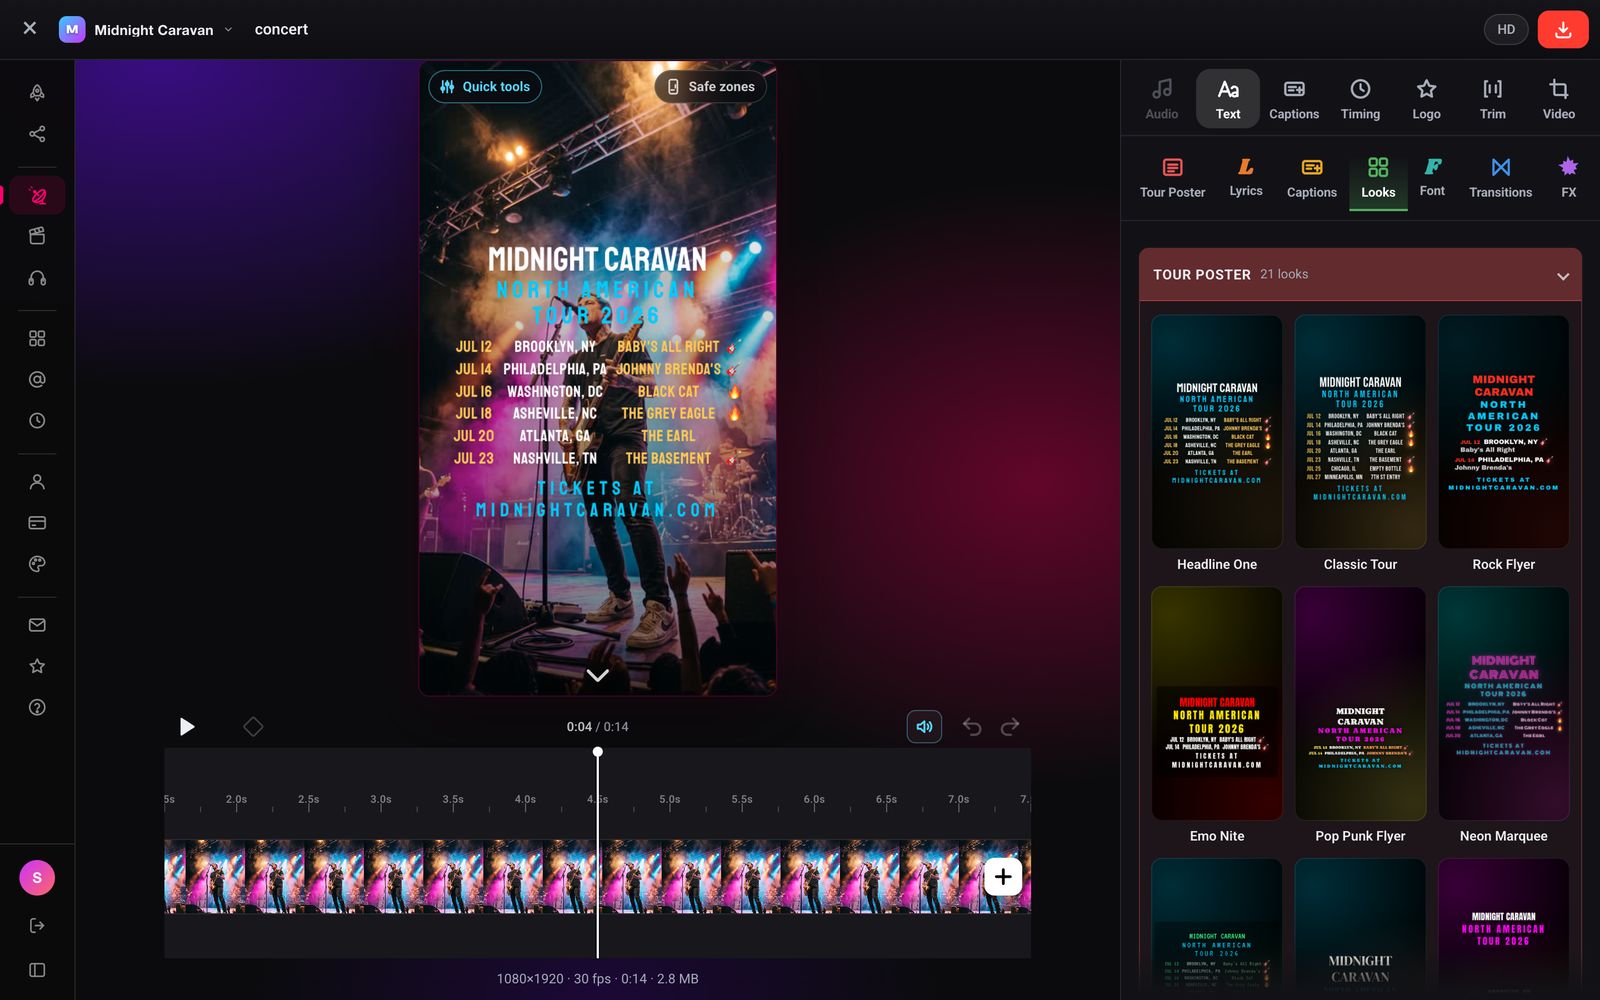
BOOSTR is BLASTR's video editor. Drop in a clip and lay a tour poster, timed lyrics or captions over it, cut it together on the timeline, pick a look, and export a finished MP4 that goes straight into a blast. Open it from the BOOSTR tab, or send a clip from your Content Library with Send to BOOSTR.
What it costs
| Plan | BOOSTR videos | Generate Captions |
|---|---|---|
| Rookie (free) | 4 total, in your first 30 days | 10 minutes of audio, total |
| Cadet | Unlimited | 10 hours of audio a month |
| Voyager | Unlimited | 10 hours of audio a month |
| Interstellar | Unlimited | 10 hours of audio a month |
- Finishing an export: one video.
- Sending a video to BLASTR: one video.
So making a video and sending it to BLASTR costs 2 of your 4. Downloading the MP4 is always free, so if you post by hand you can stretch the trial to four videos.
The 4 do not reset each month. After your first 30 days, BOOSTR needs a paid plan. If an export fails or you cancel it, the video is given back. Generate Captions never spends a video.
Making a video
- Start. Press New BOOSTR video (or drop a clip anywhere on the page). MP4 and MOV both work, including video straight off an iPhone.
- Choose what goes on it. Open Text and pick a tab: Tour Poster, Lyrics or Captions. New projects start blank, with a prompt in every field.
- Pick a look. The Looks tab has thumbnails of every built-in look, painted with your mode's words.
- Cut and style. Trim and split the footage on the timeline, add effects and text, adjust any block on the picture.
- Export. Press the download button at the top right, name the video, and it renders.
- Send it. Send to BLASTR drops the finished video into a new blast with no re-upload. Or Download MP4.
Find your way around
The toolbar holds Text, Captions, Timing (when the text comes in and goes out), Logo, Trim and Video (Change video…, with the choice to keep your look or start fresh). Text has seven tabs: Tour Poster, Lyrics, Captions, Looks, Font, Transitions and FX.
- On a computer (1024px and wider), the tools stay open in a panel on the right, and the picture never moves.
- On a phone, each tool slides up as a card. The picture stays the same size and the words lift above the card so you can still see them.
- Quick tools (top left of the picture) put sliders right on the block you've picked: block size, line spacing, text size, letter spacing, rotation and opacity. Drag a block to move it. Double-tap a block to open its settings.
- Safe zones (top right of the picture) overlays Reels, TikTok or Shorts' own buttons and captions, so you can see what they'd cover. Fit text inside pads your text into the safe area in one move. Guides are preview only and never appear in the export.
- Undo and redo sit beside the play button. The workspace switcher stays in the top bar, so you can change band without leaving the editor.
Tour Posters
The Tour Poster tab has six blocks: Headlines, Subhead, Tour dates, Legend, Footer and Layout. Tap a block's name to open it. Each one has its own on/off switch, colour, alignment, text size and a Style button.
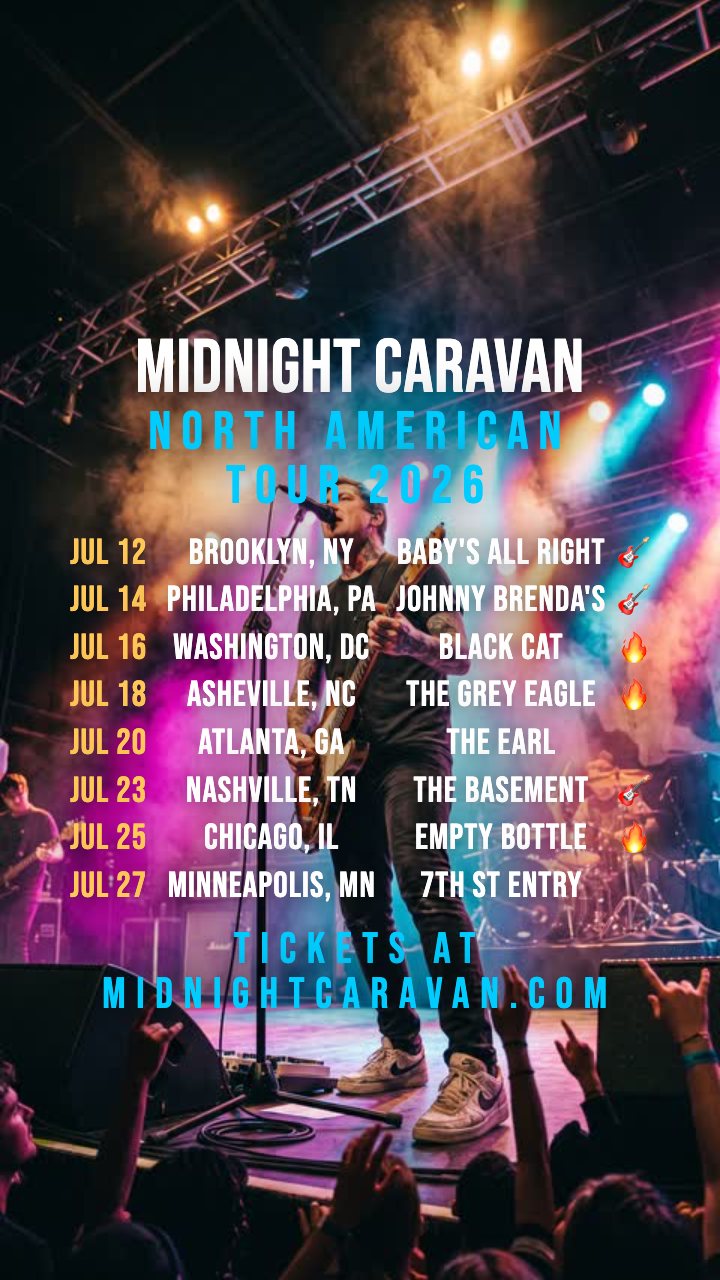
- Headlines: add more than one and they take turns across the clip while the dates carry on underneath.
- Legend: an emoji and a band name per line (
🎸 The Sun Machines), matching the emoji at the end of a date. - Layout: how the dates move (below), plus row style (Columns or Stacked), the overall text size, line gap and tracking, padding, the export shape's crop, and a backdrop behind the words.
- ALL CAPS at the bottom of the tab capitalises everything when the video is drawn, without changing what you typed.
Pasting tour dates
One show per line. Columns split on tabs, |, - , — , or two or more spaces:
JUL 12 — BROOKLYN, NY — Baby's All Right
JUL 14 | PHILADELPHIA, PA | Johnny Brenda's
JUL 16 WASHINGTON, DC Black Cat SOLD OUT- One column becomes a single line, two become date + city, three or more become date + city + venue. Lines with no separators at all still work:
9/17 Pittsburgh, PA Thunderbird Music Hall. - Ticket notes like SOLD OUT, LOW TICKETS, ON SALE, CANCELLED, POSTPONED, NEW DATE or JUST ADDED are recognised and hang at the end of that show's row instead of being read as the venue.
- A trailing emoji marks a support band and pairs with the Legend.
- Import CSV… on the Tour dates block (or drop a
.csv/.tsv): columns are date, city, venue, status, emoji, with the last two optional. A header row is detected and skipped.
Layout modes
| Mode | What it does |
|---|---|
| Stack | The whole run on screen at once, staggered in and out. |
| Cycle | A few dates at a time, paged evenly across the clip. Keeps the type big on a long run. |
| Marquee | A continuous vertical scroll with soft edges. |
| Ticker | A horizontal crawl in a band, broadcast-style. |
Style
Every block's Style button gives it its own Gradient, Stroke, Glow, Drop shadow and Extrude (a solid 3D side, with an optional Block outline around the whole shape). Apply to all copies one block's style to every block. Follow the look hands the block back to the current look.
Lyrics & Captions
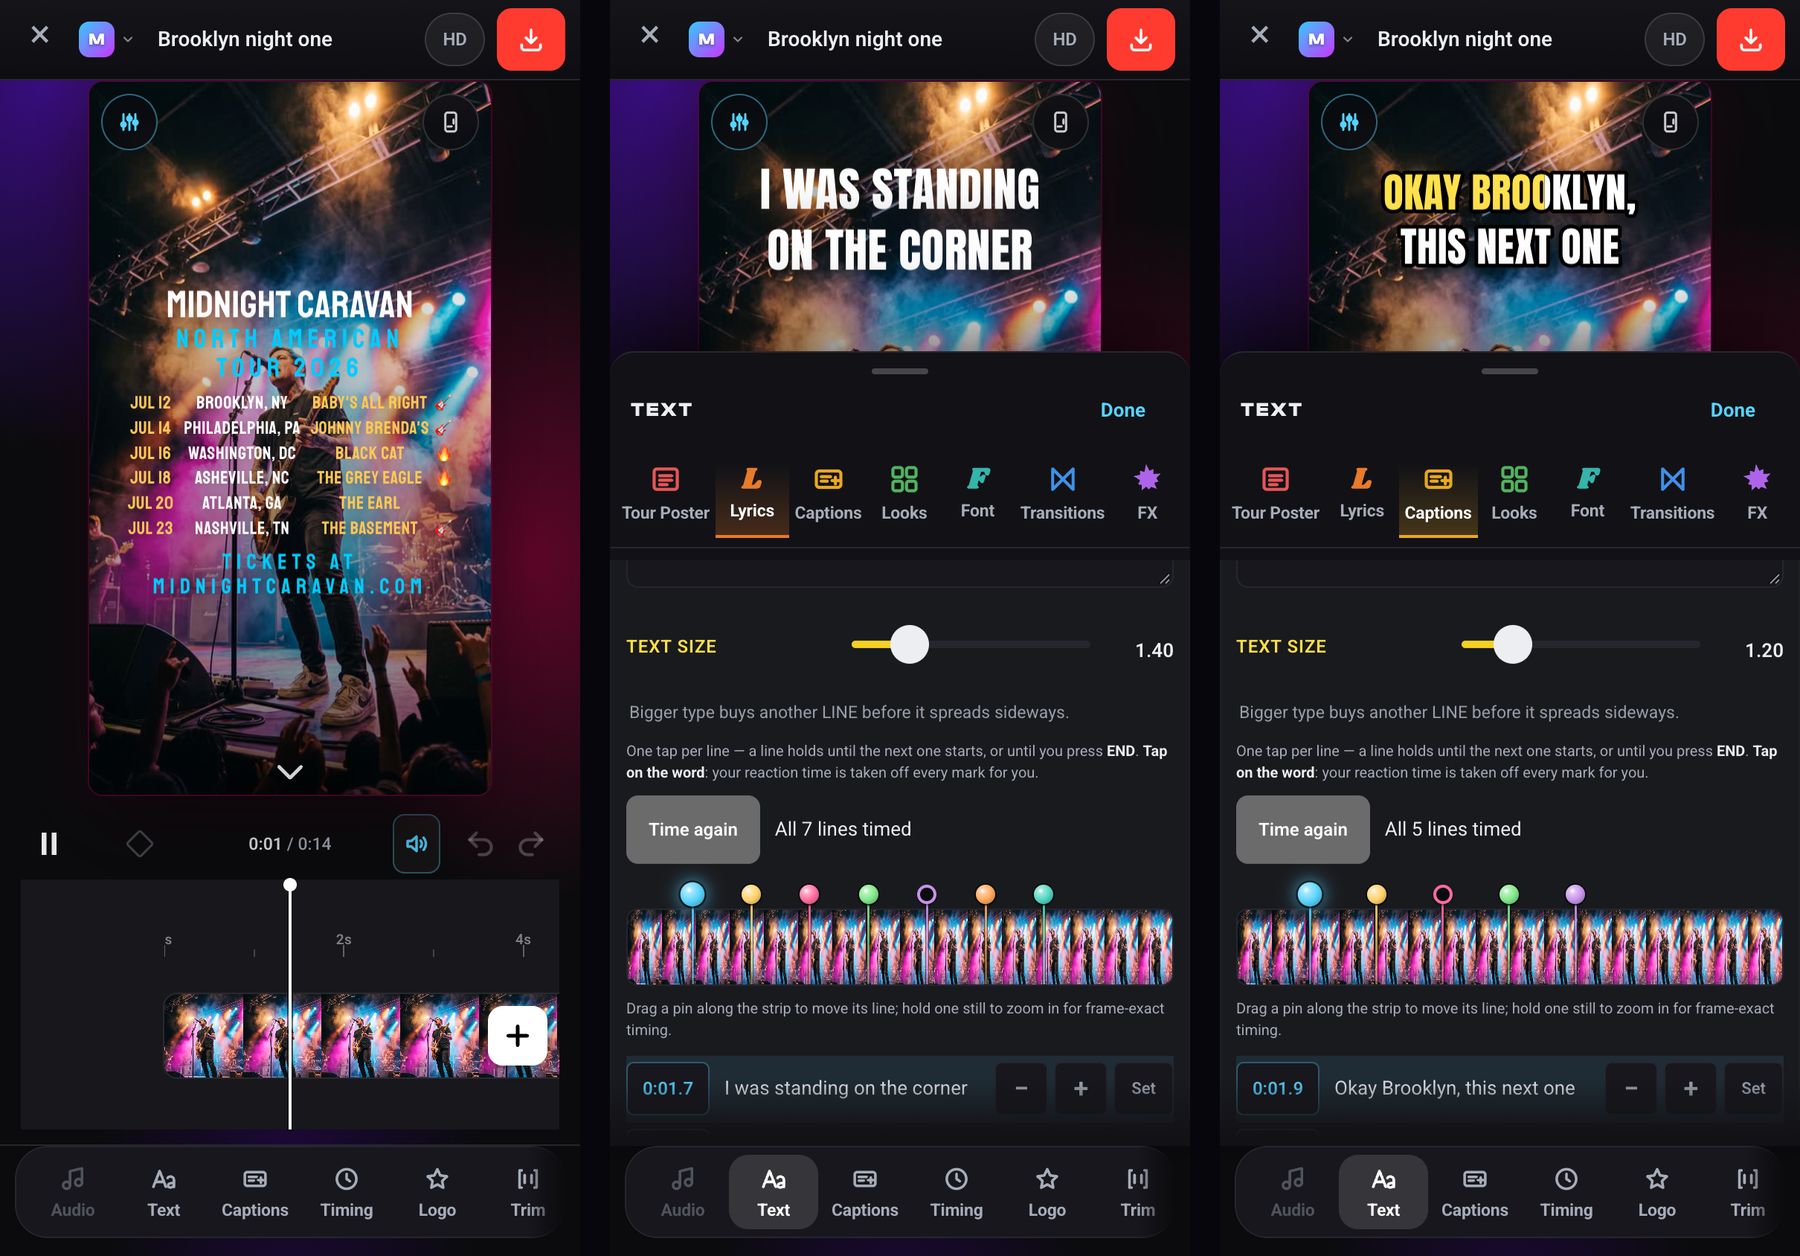
The Lyrics and Captions tabs put timed lines on the video, one at a time. The tour poster steps aside while you're in either one and comes back when you return to Tour Poster. Lyrics and captions each keep their own words, timing and look.
Timing lyrics
- Paste the words, one lyric line per line. A blank line is a line too: it clears the screen, which is how you leave room for a musical break.
- Press Time the lyrics. The song plays; press TAP (or Space) as each line starts, and END (or E) where the screen should go empty. Your reaction time is taken off every tap automatically.
- Fine-tune. Each line gets a pin on the film strip. Drag a pin to move its line, hold one still to zoom in for frame-exact timing, or use − / + on the line's row. Letting go of a pin plays from a second before it so you can hear whether it's right.
- Fix a typo by tapping the words in the list. The line keeps its timing.
- A line clears after (5 seconds by default) stops a line hanging on the screen through a long break. Lines it shortens are marked clears. Set it to 0 to turn it off.
- Each mode has its own Text size, alignment, line spacing and Nudge all to shift every line at once.
Generate Captions
On the Captions tab, Generate Captions listens to the speech in your edit and writes the captions, already timed. Everything after that works exactly like lyrics: fix any word, drag any pin.
- Only the sound of your edit is sent to our speech-to-text provider, never the picture. It isn't kept, and it isn't used to train anyone's AI.
- It reads the edit as you've cut it, so footage you trimmed out is never transcribed or charged.
- One run can be up to 15 minutes of audio. Your allowance is in What it costs, and the note after each run tells you what's left.
- Prefer to type them? Write one caption per line and time them with TAP, just like lyrics.
Looks, Fonts & Motion
- Looks. 33 built-in looks in three groups (Tour Poster, Lyrics and Captions), each shown as a thumbnail. Save look keeps your own; saved looks belong to your account, so they're on every device you sign in on. Each mode remembers the look it was wearing, so switching between Tour Poster, Lyrics and Captions never mixes them up.
- Font. 54 typefaces, from clean sans to hand-drawn, western and horror.
- Transitions. 17 entrances (Fade, Slide Up, Slide In, Punch, Drop, Blur In, Wipe, Typewriter, Glitch, Flicker, Tracking, Squash, Cascade, Wave, Scramble, Word Pop and Karaoke), each shown playing on its tile. The exit can match or differ, and In, Out and Stagger set the timing. Karaoke fills each line as it's sung; pick its Unsaid and Said colours.
- FX keeps words moving while they're on screen: Pulse, Float, Boil (a hand-drawn wobble), Neon breathe, Shimmer and Flames (pick the flame colour), with a strength dial.
- Logo. Add a logo (a PNG with transparency works best) and show it at the beginning, the end, or both, with its own size, position, transitions and FX. Hide dates while the logo is up gives the logo the frame to itself; turn it off to keep the logo up as a watermark.
The Timeline
Under the picture, the timeline shows your footage as a film strip. Pinch or ⌘-scroll to zoom. Tap the strip to pick the footage up: yellow handles appear at each end to trim it, and a toolbar shows what you can do to it.
- Cut it up. Split cuts at the playhead, and the left half stays selected, ready to delete. Shots can be copied, pasted, duplicated, deleted and slipped (moving which part of the footage plays without changing the shot's length). The track closes up behind every cut.
- Effects & filters. Effects (Shake, Pulse, Push in, Pull out, Sway, Flicker, Glitch), Filters (Mono, Noir, Warm, Cool, Vivid, Faded, Bleach, Night, Crush) and Opacity lay an effect clip on its own lane above the footage. Drag or stretch it across as many shots as you like, and use Strength to dial it in. Stack adds another lane above it.
- The + at the end of the strip adds Text (words on the picture, with their own font, colour and style), or a photo or video overlay.
- On a computer, drag a clip to move it. On a phone, press and hold a clip first, then drag.
Exporting
- Press the download button at the top right. Name this video is filled in for you; the name becomes the file name and the Content Library title.
- A progress bar shows the render, with Cancel.
- Your video is ready: Send to BLASTR, Download MP4, and the Content Library button. It reads Saved to Library when the video was filed automatically, or offers Save to Library when it wasn't. ← Back to the editor keeps working on the same video.
The chip beside the download button (it reads HD, 2K or 4K) holds the export settings:
- Shape: match source, 9:16, 4:5, 1:1 or 16:9 (move the crop under Tour Poster → Layout).
- Frame rate: match source, 24, 30 or 60 fps. Resolution: match source, 720p, 1080p, 1440p or 2160p (4K).
- Quality is automatic, picked from the size and your source's own quality. There's no bitrate slider on purpose: the only thing a manual setting could do is make your video worse.
- Keep source audio carries your clip's sound. If BOOSTR can't carry a clip's audio, it says so when you open the clip, not after the render, and asks before you send a silent video to BLASTR.
- Save to Library files every export in the Content Library's BOOSTR category. It's the same switch as the library's Save blasts & BOOSTR videos here, on by default for the whole workspace.
Your videos
Finished exports are listed under Your videos on the BOOSTR home screen. Each card has Send to BLASTR, a status chip (Saved in your Content Library, Backed up · N days left, or On this device only), and a ⋮ menu with Download, View in Content Library, Reopen look and Delete.
- Every video is kept on the device that made it, so playback and download are instant.
- On Cadet, Voyager and Interstellar it's also saved to your Content Library (when Save to Library is on), so it's on every device. Otherwise its cloud backup lasts 1, 3 or 5 days, depending on your plan.
- On Rookie, a video lives only on the device that made it. Download the MP4 if it matters.
Workspaces & Teams
Workspaces
A workspace is a complete, separate identity: its own connected socials, posts, drafts, defaults, handles, snippets, Content Library and Sounds. Manage one artist on Rookie or Cadet, up to 5 workspaces on Voyager, or 10 on Interstellar, perfect for managers running several acts.
- Switch workspaces from the bar under the top of the screen. Everything on screen switches with it, in BLASTR and in BOOSTR.
- Rename, create or delete workspaces from Manage workspaces (in the sidebar's workspace section, or your profile menu on a phone).
Teams Voyager+
Share a workspace so a bandmate, editor or manager can post for that act, and only that act.
- Open Manage workspaces and find the workspace's Team.
- Choose Invite by email, enter their email, and pick Can edit (upload and blast) or Read only (view).
- Press Send Invite. The invite is pending until they accept it from the email. They don't need a BLASTR account first; they can sign up from the link.
They get your plan inside your workspace. A teammate works at the level of whoever owns the workspace, so everyone you share with gets your Content Library (it counts against your storage), your backup window and Save draft in that workspace, even on a free account. Their blasts and BOOSTR videos there don't count against their own limits. Their own workspaces stay on their own plan.
Security & Appearance
- Two-factor authentication. Under Profile → Account Settings, turn on 2FA and BLASTR emails you a 6-digit code whenever you sign in.
- Appearance. Pick a theme: Blastr Neon, Blastr Light, Boring Monday, MySpace Classic, MySpace Coded, Windows 95 or Macintosh.
- Take the tour. The help menu in the sidebar replays the quick tour of BLASTR, and links back to this page.
Plans & Billing
| Plan | Price | Workspaces | Blasts / month | Blasts kept | Content Library | BOOSTR videos | BLASTR tag on captions |
|---|---|---|---|---|---|---|---|
| Rookie | $0 | 1 | 10 to start, then 4/mo | Failure safety-net only | — | 4 total, first 30 days | Yes |
| Cadet | $19.99/mo | 1 | Unlimited | In your library (1-day backup if full) | 50 GB | Unlimited | Off (optional) |
| Voyager | $49.99/mo | 5 | Unlimited + Teams | In your library (3-day backup if full) | 200 GB | Unlimited | Off (optional) |
| Interstellar | $74.99/mo | 10 | Unlimited + Teams | In your library (5-day backup if full) | 500 GB | Unlimited | Off (optional) |
BOOSTR is included on every paid plan. Rookie gets 4 to try in the first 30 days; see BOOSTR for how they're counted and for the Generate Captions allowance.
Content Library and Sounds come with every paid plan: 50 GB on Cadet, 200 GB on Voyager and 500 GB on Interstellar, shared across all your workspaces. We email you when it's 90% full so you can clear things out or move up a plan. Nothing in it expires while your plan is active. If your plan ends, the library turns read-only for 30 days so you can download everything, and after that it's removed from our servers. Renew within those 30 days and nothing is lost. Moving to a smaller plan never deletes anything; new uploads just pause until you're under the new limit.
Upgrade, downgrade, or manage your card any time from Profile → Billing. Payments are handled securely by Stripe.
FAQ
What is “🚀 Made with @Blastr.social” at the end of my caption?
That's the BLASTR tag, and it's how the free Rookie plan pays its way. It's added to your caption when the blast goes out, so other creators can find the tool you used, which is why your caption box only ever shows what you typed.
It goes on the end of the caption on Instagram, Facebook and TikTok. On YouTube it goes in the description, and your title is left alone.
Any paid plan removes it. Upgrade from Profile → Billing and your captions post exactly as written from the next blast on. Already on a paid plan and happy to keep the shout-out? Switch it on under Profile → Account Settings → BLASTR Tag.
Why does Instagram connect through Facebook?
That's how Meta's publishing API works. Instagram posting is only available to Professional (Creator or Business) accounts linked to a Facebook Page, so BLASTR connects the Page and its linked Instagram together in one login.
I don't have a Facebook Page. Can I still post to Facebook or Instagram?
Not without one, and that's a Meta restriction rather than a BLASTR one. Meta retired posting to personal Facebook profiles for all outside apps, so every tool like BLASTR can only publish to a Facebook Page. Instagram publishing runs through that same Page, which is why it's needed for Instagram too.
Creating a Page is free and takes a couple of minutes: on Facebook, Pages → Create new Page, named after your band, project or brand. Then switch Instagram to a Creator or Business account and link it to that Page. Full steps are in Connect Your Socials.
In the meantime, YouTube and TikTok need no Page. Connect those and start blasting today.
Facebook signed me in, but BLASTR says it couldn't find any Pages.
The login worked and the permissions were granted, but Meta reported that the Facebook account you signed in with doesn't run any Pages. There are two usual causes:
- You don't have a Page yet. Create one (see above), then reconnect.
- You have a Page but didn't tick it on Meta's permission screen, or you signed in with a different Facebook account from the one that manages it. Reconnect with the right account and make sure every Page you want is ticked.
My Instagram posts go to the wrong account. How do I fix it?
Your workspace is connected to a different Page than you meant. Reconnect from Connections, sign in with the Facebook account that manages the right Page, make sure that Page is ticked in Meta's permission screen, then pick it in BLASTR's account picker.
Why didn't my Instagram collaborator show up on the post?
Collaborators have to accept the invite in their Instagram notifications before they appear as a co-author. Their account must also be public, you can invite at most 5, and you can't invite your own posting account.
Why won't my long video post to Instagram?
Instagram only lets outside apps publish videos as Reels, and caps Reels at 90 seconds. Anything longer is refused before it posts. This applies to every posting tool, not just BLASTR. When a clip is too long, the composer's checklist warns you, and your other platforms (YouTube, TikTok, Facebook) still post. For Instagram, trim a highlight under 90 seconds.
The Instagram app lets me post 10-minute videos. Why can't BLASTR?
The Instagram app publishes long videos with Instagram's own private tools, which no outside app can use. Apps like BLASTR can only use Instagram's public posting API, which publishes videos as Reels and caps them at 90 seconds. There's no setting or workaround; we tested it directly. YouTube and TikTok both handle long-form, so they're the home for anything over 90 seconds.
My Share to Story didn't post but the Reel did. Why?
Instagram Stories are capped at 60 seconds. If your clip is longer, the Story is skipped while the Reel (up to 90 seconds) posts normally. The checklist warns you before you blast.
Can I post publicly to TikTok, or choose who can view?
Yes. BLASTR posts directly to your TikTok account, and you choose Everyone, Friends or Only you in TikTok's options before you blast. Would you rather finish the post in the TikTok app? Turn on Send to TikTok Inbox and the video arrives there for you to edit and post.
Can I schedule a TikTok post?
Yes. TikTok has no scheduling of its own, so BLASTR's servers hold your video and send it at exactly the time you chose, just like Instagram. With Send to TikTok Inbox on, the video arrives in your inbox at that time and you post it from there; otherwise it publishes directly.
Why did my Facebook post go out a few minutes after the others?
Facebook won't accept a scheduled post less than about 10 minutes away. When you schedule something sooner, BLASTR moves only the Facebook post to the earliest minute Facebook allows, rather than failing it or posting it early, and the post's card tells you the new time.
What file types are supported?
- Video: MP4 or MOV work best, and other common formats are converted. Vertical 9:16 is recommended.
- Photos: JPG, PNG or WebP, in 1:1, 4:5 or 9:16 (the built-in crop tool can fix any ratio).
- Shooting on iPhone? Videos recorded in HEVC (the iPhone default) are converted automatically so every platform accepts them. Nothing to change on your end.
A platform failed during my blast. Is everything lost?
No. Each platform posts on its own. If one fails, the others still go out, and the post's card shows which one failed so you can retry just that platform from the ⋮ menu.
What is BOOSTR, and do I need it?
BOOSTR is BLASTR's video editor. It puts tour dates, timed lyrics or captions over a clip and renders a finished MP4 you can post. You don't need it to use BLASTR: if you already have videos, blast them as normal. BOOSTR is for when you have footage but no announcement, lyric video or captions yet. See BOOSTR.
How many BOOSTR videos do I get on the free plan?
Four, in your first 30 days. After that BOOSTR needs a paid plan, and the 4 don't reset each month. Every paid plan (Cadet, Voyager, Interstellar) is unlimited.
Why did sending a video to BLASTR use one of my free BOOSTR videos?
On the free plan there's one pool of 4, and two actions spend from it: finishing an export, and sending a video to BLASTR. A video you export and send costs 2 of your 4. Downloading the MP4 is always free, so if you post by hand you can get four videos out of the trial.
My BOOSTR export failed (or I cancelled it). Did I lose a video?
No. A failed or cancelled export is given back automatically. You're only charged for renders that finish.
Why can't I export in my browser?
BOOSTR encodes video with WebCodecs, which not every browser has. You can still open BOOSTR, design your video and watch the preview, but exporting needs Chrome, Edge, or Safari 16.4 or later. BOOSTR tells you up front rather than failing at the end of a render.
I closed BOOSTR in the middle of an edit. Is it gone?
No. BOOSTR keeps the clip, the words and every cut on your device as you work. Go back to BOOSTR and either the editor is still open, or the home screen offers Pick it back up.
Where do my BOOSTR videos go, and how long do they last?
They're listed under Your videos on the BOOSTR home screen. Each one is kept in your browser on the device that made it (so playback and download are instant) and, on a paid plan, saved to your Content Library's BOOSTR category so it's on every device. On Rookie it stays on the device that made it, so download anything you want to keep.
Is my footage uploaded when I use BOOSTR?
Not to make the video. The render happens entirely in your browser, so your clip never leaves your device. (A clip you send from the Content Library is downloaded into BOOSTR, since it's already stored with us.) On a paid plan the finished export is saved to your Content Library, and a video you send to BLASTR is uploaded to the platforms you blast it to.
The one exception is Generate Captions: when you press it, the sound of your edit (audio only, never the picture) is sent to our speech-to-text provider to write the captions. It isn't kept, and it isn't used to train anyone's AI. Your in-progress edit is saved in your browser, on your device.
I hit my blast limit on the Rookie plan. What now?
Rookie includes 10 blasts in your first 30 days, then 4 a month. Your count resets at the start of each month, or upgrade to Cadet, Voyager or Interstellar for unlimited blasts from Profile → Billing. (Blasting in a workspace someone shared with you never counts against your own limit.)
Who owns what I upload? Does BLASTR keep it?
You own everything you upload: your videos, photos, music and album art. BLASTR doesn't own it, claim any rights to it, sell it, or use it to train AI. We only store it and send it where you tell us to.
It's private to you and the people in that workspace, plus anyone you send a share link to. When you delete something, it's deleted from our servers. There's no hidden archive or backup we could restore it from. Deleting doesn't reach copies outside BLASTR: posts already published to a platform, and files someone downloaded.
How do I delete my data or account?
Delete any single video, photo or song from its ⋮ menu in the Content Library or Sounds, or your whole account from Profile → Account → Delete Account. Both take effect immediately. The Data Deletion page has the details, or email [email protected].